How to make a WordPress website
Need to switch to online asap and don’t have a website yet? WordPress is your best friend! Whether you want to create your own personal blog, an online store, or a business website – with WordPress, creating your own website is easy as pie. If you know what you’re doing, of course. In this video, we’ll guide you through the steps needed to make a WordPress website.
Table of content
- Table of content
- 1. Introduction to WordPress
- 2. Getting started with WordPress
- 3. Customizing your site
- 4. Creating content in the Block Editor
- 5. Structuring your site
- 6. Managing your WordPress site
- 7. WordPress SEO
- Conclusion
1. Introduction to WordPress
WordPress is a content management system (CMS), which means it allows you to build a website and publish content that you want to share with the world. There are basically three elements that are central to what WordPress does:
- It is a text editor that allows you to create content
- It offers ways to manage and structure your content
- It has options to customize how your site works and what it looks like
One of the cool things about WordPress is that there are gigantic libraries of ready-to-use templates and features that people have created for you to hand-pick and use on your site. Some of those are free, and for some you’ll have to pay.
WordPress itself is free, which means you won’t have to pay license fees to use it: you can just download it. WordPress is open-source software. Open-source software is a software that is developed within a community. Everyone can use, alter and distribute the code.
Read more: What is WordPress? »
The difference between WordPress.com and WordPress.org
There are two different versions of WordPress: WordPress.com and WordPress.org. In short, WordPress.com is basically a site where you can create an account and, like that, create your own site or blog. WordPress.org allows you to download the WordPress software so you can install it on your own site. While the latter sounds more difficult, we also think it has a lot of advantages.
We recommend using WordPress.org. This option has much better customization options, and you can install any theme, plugin, and do just about anything with your site.
2. Getting started with WordPress
Getting WordPress up and running
Hosting
When setting up a WordPress.org site, the first thing you’ll have to decide is what hosting company and what hosting plan suits your needs. You can think of the following elements:
- the server location
- the type of site you’re building
- how much storage space and bandwidth you need
- what type of hosting you need (shared, dedicated or VPN)
Keep reading: WordPress hosting »
Select a domain name
When you’ve decided which hosting party is fit to take care of hosting your site, you should think about which domain name you want to have for your site. A domain name is a convenient way to point people to that specific spot on the internet where you’ve built your website. Domain names are, generally, used to identify one or more IP addresses. So for Yoast, that domain name is yoast.com.
Domain names are a very important aspect of building a brand and thus require some thinking. You want people to be able to recognize you and find you if they’re looking for you. That’s why it’s often a good idea to have a short domain name. If it’s catchy, that helps as well, of course. Ideally, you also want a domain name that’s easy to spell. If you have a company, you’ll probably want your company name as a domain name.
Read on: Domain names and their influence on SEO »
Choose a TLD
Another very important thing to consider is what top-level domain (TLD) you choose. A TLD is, to keep it simple, the last part of the domain name. So for yoast.com, Yoast is obviously the brand, and .com is called a TLD. Generally speaking, we distinguish between several types of TLDs:
- Country code TLDs (ccTLDs):
Each country has its own TLD, e.g. .nl for the Netherlands, .fr for France, and .de for Germany - Generic TLDs (gTLDs)
These are basically all other domains, like .com, .info, .net, .edu and .gov - Infrastructure TLDs
Infrastructure TLDs are TLDs like .arpa. You can’t register a domain under .arpa, it’s only used for infrastructure purposes.
Keep on reading: Top-level domains (TLD) »
Setting up your site
Pick a strong username and password
When setting up your site, you have to pay attention to picking a strong username and password for the admin account. The administrator (also: admin) account in WordPress is the first account you set up. It’s the most powerful user role, which is reserved for site owners and gives you full control of your WordPress site. Make sure that you never use admin as a username!
Read more: Why you shouldn’t use admin as a username »
Make sure your website is on HTTPS
You also have to make sure your website is on HTTPS. When users engage with your site, they do so over what’s called an HTTP or HTTPS connection. The difference between these two connections is that, under HTTPS, all the connections between your site and the visitor are encrypted. This means no one else can read what’s going on between the visitor and the website. Thus, using HTTPS is a safer way of sending data than HTTP.
Navigating the WordPress backend
Now that you have installed WordPress, it’s time to explore the WordPress back end! You can see the WordPress back end as your control room: this is from where you can add, edit, and remove the content on your site, as well as control what your site looks like.
Logging in
To access the WordPress Dashboard, you need to follow these steps:
- Go to your WordPress login URL. If you haven’t changed this, this URL is www.yoursite.com/wp-admin
- Enter your WordPress username and password and click ‘Login’. If you’re already logged in, you’ll be taken to your WordPress Dashboard without having to enter your login credentials.
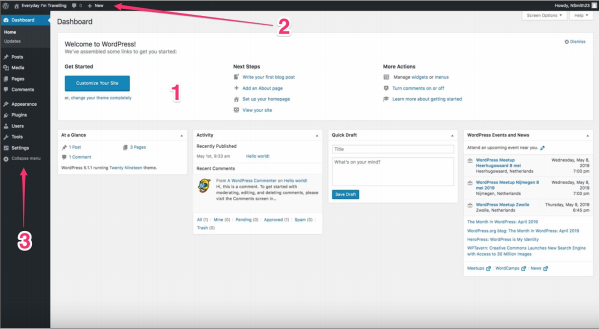
This takes you to a screen like the image below, where you see the WordPress Dashboard (1), the admin toolbar (2), and the admin menu (3).
The WordPress Dashboard
The WordPress Dashboard gives you an overview of what’s happening with your site. It’s the control room of your site, where you have a bird’s eye view of operations. The Dashboard contains widgets, which you can customize to make the Dashboard fit your needs. You can rearrange the widgets, simply by dragging and dropping them. Here we’ll discuss the default widgets:
At a Glance
As the name already implies, the At a Glance widget offers an ‘at-a-glance’ look at your site’s posts, pages, comments, and theme. As you can see in the image, it shows you the number of current posts (1), pages (2), and comments (3). It also shows you what version of WordPress you’re running (4) and which theme is active on your webpage (5).

Activity
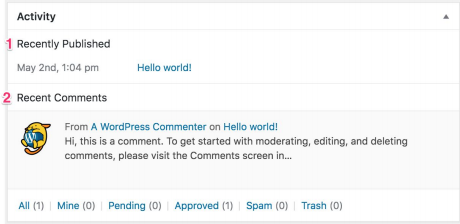
For a more detailed preview of your posts and comments, you should take a look at the Activity widget. As you can see in the image below in this widget, you see your most recent published posts (1) and the recent comments (2). In the recent comment section, you can see who commented and clicking on the user link lets you visit their profile. If you hover over a comment with your mouse, a list of actions will appear. From here, you can choose to approve or disapprove, reply, edit, see the history, mark as spam or put it to the trash. You can reply to a comment from the WordPress Dashboard. Simply click ‘reply’ and a form in which you can type your comment will appear.
Quick Draft
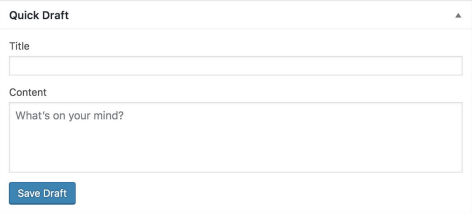
The Quick Draft widget contains a mini post editor that allows you to create drafts instantly from the Dashboard. If you have a new idea, and you want to jot it down quickly, you can do this via the Quick Draft widget. All you have to do is enter a title, write a piece of text and click ‘Save Draft’. As the title already suggests, this is just a draft, and therefore it won’t be published on your site yet. Clicking on the link of the draft will take you to the post editor, where you can edit the draft and write a longer and complete version of your idea.
WordPress Events and News
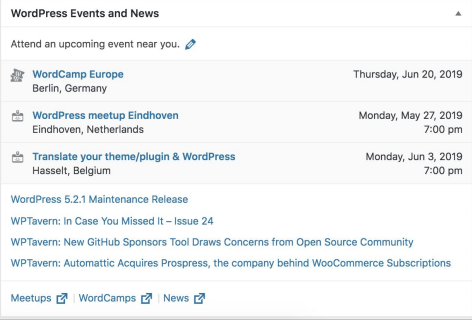
Finally, in the WordPress Events and News widgets, you are offered a quick glimpse of what’s happening in the WordPress world. It shows an overview of WordPress-related news and upcoming WordPress events, like Meetups and WordCamps.
The admin toolbar
At the top of the WordPress Dashboard, you see a black bar. This is your administrator toolbar, or in short: admin toolbar and it’s just visible to you, not to people visiting your site.
The admin menu
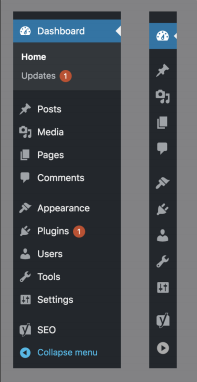
The admin menu is the sidebar on the left side of your screen. As shown in the image below, you can view the admin menu expanded or collapsed. The admin menu consists of various menu items. In this lesson, we’ll go into the default menu items of the admin menu. Please note that if you have any plugins installed, there may be extra, plugin-specific, items in your admin menu. For example, in the image below, you’ll see the menu item of the Yoast SEO plugin at the bottom of the list.
3. Customizing your site
Settings
When you start with WordPress, you’ll probably want to brand your website and give it a personal touch. Eager to start customizing your website? The settings menu in WordPress is a great place to start!
Themes
A theme handles the way your WordPress site looks. It serves as a representation for your brand, but – at the same time – takes care of the visual representation of WordPress content and data, like pages and posts. Simply put, a theme is what a person will see when visiting your website.
Keep reading: How to find the perfect WordPress theme »
The Customizer
With the Customizer, you can quickly make changes to the design of your site or the elements on your pages, such as your site branding, menus, and widgets. And you won’t have to touch any code!
Widgets
A WordPress widget is a simple, pre-built block you can add to your site that serves a specific function, like a search bar, a list of your most recent posts, or an archive of your posts. Widgets can only be put into so-called widget areas. These areas are defined by your theme and are usually located in the sidebar(s) and the footer of your site.
Plugins
WordPress plugins are pieces of software that you install to add extra features and functionalities to your WordPress site. They allow you to go beyond what a basic WordPress installation has to offer. There are tons of plugins with a lot of different functionalities, like speed up your site, filter out spam comments, secure your website, and set up an online shop.
4. Creating content in the Block Editor
The difference between posts and pages
In WordPress, there are two primary content types: posts and pages. Depending on the type of content you want to have, and how you plan to use that content, choosing between posts and pages can make a difference. Four main things set posts and pages apart:
- The time of publication is relevant for posts, but not for pages.
- Post feature an author and pages don’t.
- Posts are archived in WordPress and pages aren’t.
- You can leave comments on posts. Comments on pages are disabled by default.
How to write a post in WordPress
Writing a post is one of the most exciting and creative things you can do in WordPress. And luckily, it’s relatively easy too. Let’s dive into how it works.
- Click on the posts menu item in the admin menu.
This will open the Posts screen. See 1 in the image.
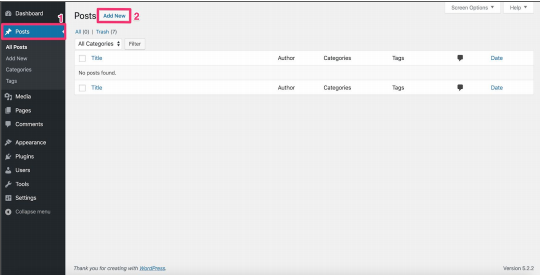
- In the Posts screen, click the Add New button.
The Post editing screen will open. Note: the Post editing screen may appear slightly different, depending on the theme you’re using. See 2 in the image.

- Add a title in the Add title field
See 1 in the image.
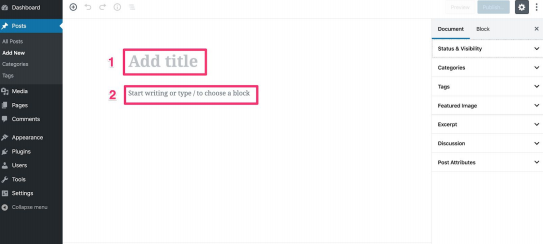
- Start typing your content in the field below the Add title field
See 2 in the image.

How to write a page in WordPress
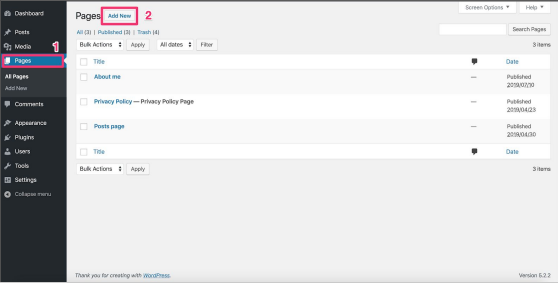
Now that you know how to write posts, writing a page will be very easy. To start writing a page, you will need to follow the steps below. Once you access the page editor, writing a page works exactly like writing a post. Just like posts, you also use blocks to create pages.
- Click on the Pages menu item in the admin menu (1 in the image)
- Click the Add New button in the Pages screen (2 in the image)
5. Structuring your site
Organizing your website
When creating a website, it’s crucial to think hard about how you will structure it. An organized website is one that contains posts and page, which are grouped and linked in a structured manner. A disorganized website is just a pile of content with no apparent order. Surely, you would like to have an organized site that your visitors will find easy to navigate.
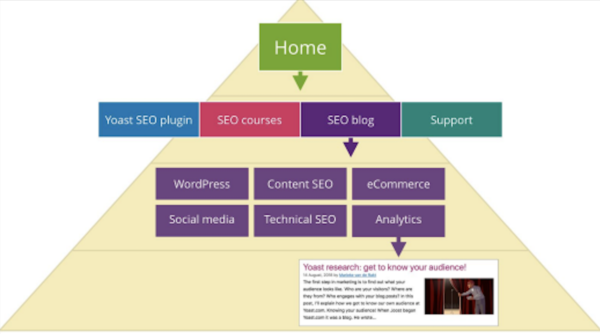
Let’s start by looking at an ideal situation: if you’re starting from scratch, how should you organize your site? We think a well-organized website looks like a pyramid with a number of levels:
- Homepage
- Categories
- Subcategories (only for larger sites)
- Individual pages and posts
The homepage
It goes without saying that your homepage should act as a navigation hub for your visitors. You should link to the essential pages from
your homepage. By doing this:
- your visitors are more likely to end up on the pages you want them to end up on;
- you show search engines that these pages are essential.
Of course, if your site gets bigger, you won’t be able to link from the homepage to all of your important pages. For example, if you write a lot of articles or have a lot of essential articles, you cannot link to all of them from your homepage. That would be bad for two reasons:
- It would lead to clutter, which will make it hard for your visitors to notice the pages you want them to visit.
- It would weaken link value for every individual link. With too many links on a page, every link is just a little less valuable for the page it links to.
Navigation
In addition to having a well-structured homepage, you should also create a clear navigation path on your site. Your site-wide navigation consists of two main elements:
- The menu
- The breadcrumbs
The website menu is the most common aid. for navigation on your website, and you want to make the best possible use of it. Find out how you can optimize your website menu for your users and for SEO. If you want to make your site’s structure even more explicit you can add breadcrumbs to your pages. Breadcrumbs are clickable links that are usually visible at the top of a page or post. Find out what breadcrumbs are and why they are important for SEO.
Taxonomies
WordPress uses so-called taxonomies to group content. Two major elements that help you with organizing your site are categories and tags. Categories and tags are examples of taxonomies.
Read on: What is the difference between tags and categories? »
Archive pages
Archive pages are generated when you create a category, tag, or another taxonomy (in WordPress, at least). They have their own unique URL on your site. Posts or (product) pages that belong to that taxonomy are presented in a list on these archive pages. So, these archives can be based on various things: this could be categories and tags, but also the post date and post author, or something else if you created a custom taxonomy or use a plugin that creates one.
Keep on reading: A tutorial on WordPress archive pages »
6. Managing your WordPress site
User roles in WordPress
You could be managing your WordPress site with multiple users. To make this easier, WordPress created a number of user roles. A user role determines what someone can do on your site. There are six predefined user roles to choose from:
- Super Admin
- Administrator
- Editor
- Author
- Contributor
- Subscriber
Next to these predefined roles, developers can also create extra user roles. You can assign and change user roles via the Users menu item in your WordPress admin menu.
Read more: Roles and Capabilities »
Updates and backups
Updating WordPress core, themes and plugins is important for three reasons:
- Security;
- Bugfixes;
- New features
However, updating comes with risks. To minimize risks, use high-quality plugins and themes, look at what is updated in the version details, and make a backup of your site before updating. WordPress also offers an updates overview, which you can access via the admin menu (Dashboard > Updates). Here, you’ll find all the updates available for your site.
It is important to make backups of your site because they allow you to go back to an earlier version of your site when an update causes issues, but they could also be useful when you experience trouble with your hosting provider or get hacked. There are basically three ways to create backups of your WordPress site:
- Manually;
- Through your host;
- By using a WordPress plugin.
Keep reading: How to backup your (WordPress) site »
Common mistakes
By now, you have probably noticed that WordPress is relatively easy to use. Even with no prior experience in building websites, creating a website with WordPress can be a piece of cake. Still, even with all the features that make WordPress easy to use, sometimes people can make mistakes. In this post, we explore the most common beginner’s mistakes in WordPress. And, of course we’ll also give some tips on how to avoid these mistakes.
Security
Securing your website may sound like a daunting process. But there is good news! You can improve the security of the website yourself. You do not even need to have technical or coding skills. Even some small adjustments can make the difference between a hacked site, and a happy and healthy website. You can think of the following things:
- Make sure you always keep your WordPress core, plugins and themes up to date!
- Make sure that your WordPress password is complex, long and unique (CLU)
- Use a password generator to create safe passwords
- It’s safer to use two-factor authentication
- Use a secure, HTTPS connection
- Pick a host with solid security features
Read on: WordPress security in a few easy steps »
7. WordPress SEO
We’ve discussed how you can create a great site with WordPress. But, what is a great site without visitors? Creating a great site is unfortunately not enough to make people visit your site. And that’s where the real challenge begins. Creating a WordPress site is only the first step on your way to stardom. For the other steps, you need to work on your SEO (Search Engine Optimization).
SEO stands for search engine optimization and it’s the process of improving websites and content to get more traffic from search engines. It has an on-page and off-page part. So, let’s go through the things that WordPress does for your site’s SEO out of the box.
- A strong foundation
WordPress helps you get going quickly and it’s a pretty solid platform to work on. A basic setup can provide a strong foundation – even without extensive customization, theme optimization and plugins. - Pretty permalinks
It supports so-called pretty permalinks so you can use SEO-friendly URLs. - Title tag
WordPress also supports the title tag. This makes sure that the title you entered is also rendered in the code, so the search engines know exactly where to find the all-important title of your post. - Duplicate content
Also, WordPress automatically deals with some cases of duplicate content on particular pages. By that, we mean that your site sometimes shows the same content on different URLs. WordPress doesn’t fix all of it though, but luckily Yoast SEO helps you out with the rest. - Site Health
Lastly, a recent addition is the Site Health dashboard that shows you how your site is doing in a technical sense.
WordPress SEO is an exciting, but also gigantic subject to tackle. That’s why we made a definitive guide to WordPress SEO. This guide gives you a lot of stuff you can do on your WordPress site. It goes from technical SEO and conversion tips to content and marketing best practices, and a whole lot in between. So, make sure you check out this guide to higher rankings for WordPress sites.
Conclusion
That’s it! It was probably a lot to take in, which is why we recommend taking the WordPress for beginners training course. You’ll find everything you need to know if you’re a WordPress newbie. The training includes quizzes that test whether you have mastered the subject. And, it’s online and on-demand, so you can get started whenever you want! Good luck!

 See more from the WordPress for beginners series

I must confess that without Yoast, it wouldn’t have been possible for me to publish my dream blog “ourpositivestory.com”. Thanks a lot for this awesome step-by-step post on creating a website on WordPress.
I always wanted to learn that how to make a wordpress website because almost 40% of the website are made up on wordpress as it done coding for you automatically.
I just created WordPress site. Thanks a lot for amazing Tutorial. I love Yoast SEO Plugin alot. Heard a lot about it. Looking forward to buy it soon when i have some funds.
I wish that Yoast had a service for non- WordPress sites where you could check SEO as you go like WordPress. I’m a PHP developer and client’s verbiage is not always that great when I get it. I remember best practices from my own WordPress/Yoast site, but it sure would be nice to see a green light as I’m editing my clients’ verbiage. Hmm… something for the wishlist perhaps? I know I’d be most willing to pay for such a service. Sure, there’s Google Search Console but it’s not that intuitive, you’re mostly dealing with what they have indexed already, and getting a response after fixing something they didn’t like can take days.
Hi Adrienne! Thanks so much for your appreciation :-) Which platform do you use? These are the platforms we do have extensions/plugins/modules for: https://yoast.com/yoast-seo-platforms/ or you can even help develop it for your platform: https://developer.yoast.com/development/integrating/
As always, the information you deliver is gold. Thank you So much! I truly appreciate the work you do. Your step by step guide will help me for creating WordPress website.
Thank you Laura, good luck!