Optimize your site with the accessibility checklist

Accessibility helps you open up your content to a wider audience, so more people are able to access your site. A great resource to help get you started is this list of accessibility checks made by the World Wide Web Consortium (W3C). In this post, we’ll highlight a few important checks, so make sure you read the rest of the checklist as well. Let’s optimize your website for every visitor!
What is accessibility and why is it important?
Accessibility is making sure as many people as possible can use your site. Makes sense, right? After all, you’ve created a website because you want to reach your audience. And by following the checklist, you make sure you’re reaching everyone.
If you don’t, there might be people who can’t access information on your site. You’d be neglecting a huge part of your audience and in turn, missing out on a bunch of engagement and SEO opportunities. So, let’s get to work and check off these accessibility checks!
Provide a text equivalent
For every non-text element, you should provide a textual equivalent. That goes for things like images, but also for everything ranging from image map regions and animated GIFs to stand-alone audio files and video. This can be done with alt or longdesc tags, for instance.
For videos, it can be done by adding closed captions to your videos. If you upload your videos to YouTube, you can let YouTube automatically generate closed captions. Still, it’s good to run through them and check if they’re correct.
Same goes for TikTok and Instagram reels. Most social media provide automatic captioning, so be sure to use them! And don’t forget to change the alt tags or closed captions when the non-textual part changes.
Mind your colors and contrast
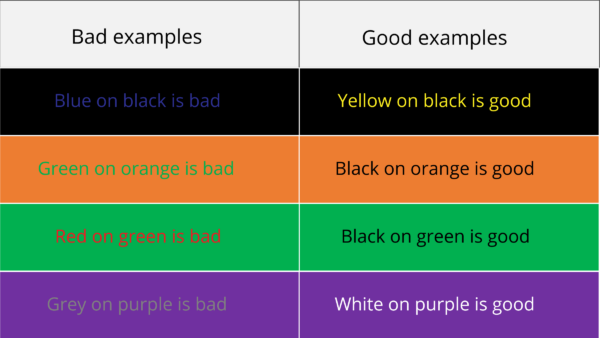
For people who are colorblind or have a visual impairment, certain color combinations and contrast simply don’t work. They won’t be able to read your text. That’s why you should always check if your website’s contrast and colors work together.

The quick and easy method? Convert your website to grayscale. That way, you’ll quickly see what’s readable and what isn’t. You can also use online tools to check the contrast of a web page. Plus, we have a post on accessibility tools, where we mention more in-depth accessibility checks for color and contrast.
Flickering
Did you know that if content flashes more than three times per second, it’s potentially dangerous? It might cause photo-epileptic seizures for some people. But it’s also straining on the eyes in general. That’s why you should avoid using flickering like this with animated gifs, blinking text, etc. And if you must use it, make sure that users can disable the flickering.
Make sure your website can be used with a keyboard interface
This accessibility check is especially important for people who have little or no use of their hands, or who don’t have hands at all. They’ll rely on a keyboard to navigate your website.
Keyboard users generally use the tab key to navigate through interactive elements like links, buttons, and fields for putting in text. A sighted keyboard user (someone who can see) must be able to see that they’ve focused on something with the tab key. This focus is typically indicated by a border or highlight around the element. So make sure that your site clearly shows this too!

Try and use your site with tab only! See if it’s easy, and if it’s not, please make sure you fix it.
Allow users to control time limits
You can probably imagine that navigating a website with a keyboard instead of a cursor isn’t always as fast. So, tasks with a time limit can be stressful for keyboard users. And not just them, but people with motor disabilities or generalized anxiety disorder, and people who take longer to read or have low vision may also find time limits hard to navigate.
That’s why you should allow users to control the time limits, or at the very least give them a warning at least 20 seconds before their time expires. If possible, allow them to get an extension.
Use clear and simple language
The checklist says: use the clearest and simplest language appropriate for a site’s content. Don’t try to make it overly complicated. And be mindful of abbreviations (screen readers can’t understand those) and idioms! While it might make sense for you as a native speaker, it doesn’t always translate well. For example, if we were to write “now comes the monkey out of the sleeve”, which is a Dutch idiom, you probably have no idea that we mean someone finally shows what they are truly like.

Writing clearly is obviously not just good for your site’s accessibility, but also for your SEO and user experience in general. To help you, we’ve created the readability analysis in our plugin. This analysis will help you write better texts. It scans your text and tells you for example if your paragraphs are too long, or you’re using the passive voice too much.
Help your users to avoid mistakes
Let’s say you offer a service where people need to fill in their personal information, or people can take a quiz on your site to find out what product suits their wishes. It doesn’t matter how great your explanation beforehand is, people will still make mistakes. What matters is what you tell people when they’ve made a mistake.
Tell your users what they did wrong and give them an easy-to-understand suggestion on how to do it correctly. Don’t use difficult language. What if someone chose the wrong option? If possible, make sure users can reverse their actions. Otherwise, give them the opportunity at the end of the survey/quiz/etc. to review and confirm or correct their answers.
Read more: Writing accessible content: 4 checks you can do with Yoast SEO and the block editor »
What if you can’t change your site?
To put it bluntly: most of the accessibility checks mentioned in this post are not difficult. And luckily, most of the WordPress themes and other website builders are focused more on accessibility. Still, if your theme or site doesn’t cooperate while you’re implementing these awesome accessibility changes, then you should probably find a better theme for your site.
Conclusion: let’s get to work!
By thinking about accessibility, you’re actually thinking about design, the use of textual and multimedia content, and the structure of your site. So look at your colors and contrast, your alt tags and closed captions. And try to use your site with just your tab key! Let’s make sure that your website is accessible for everyone.
Keep reading: Easy-to-use accessibility tools »


Fantastic article! As a wedding and portrait photographer, I understand the importance of making content accessible to everyone. Your checklist is a great tool, not just for web developers, but for anyone looking to broaden their audience reach. The tips on using clear language and ensuring color contrast are particularly insightful. It’s a great reminder that accessibility is about inclusivity, making sure everyone can enjoy and engage with our content. Thanks for sharing these valuable insights!
Thank you for your comment and it’s great to hear that you find the checklist helpful! :) Lots of luck with your business!