The ultimate guide to robots.txt

The robots.txt file is one of the main ways of telling a search engine where it can and can’t go on your website. All major search engines support its basic functionality, but some respond to additional rules, which can be helpful too. This guide covers all the ways to use robots.txt on your website.
Warning!
Any mistakes you make in your robots.txt can seriously harm your site, so read and understand this article before diving in.
Table of contents
What is a robots.txt file?
A robots.txt file is a plain text document located in a website’s root directory, serving as a set of instructions to search engine bots. Also called the Robots Exclusion Protocol, the robots.txt file results from a consensus among early search engine developers. It’s not an official standard set by any standards organization, although all major search engines adhere to it.
Robots.txt specifies which pages or sections should be crawled and indexed and which should be ignored. This file helps website owners control the behavior of search engine crawlers, allowing them to manage access, limit indexing to specific areas, and regulate crawling rate. While it’s a public document, compliance with its directives is voluntary, but it is a powerful tool for guiding search engine bots and influencing the indexing process.
A basic robots.txt file might look something like this:
User-Agent: *
Disallow:

Sitemap: https://www.example.com/sitemap_index.xml
What does the robots.txt file do?
Search engines discover and index the web by crawling pages. As they crawl, they discover and follow links. This takes them from site A to site B to site C, and so on. But before a search engine visits any page on a domain it hasn’t encountered, it will open that domain’s robots.txt file. That lets them know which URLs on that site they’re allowed to visit (and which ones they’re not).
Read more: Bot traffic: What it is and why you should care about it »
Where should I put my robots.txt file?
The robots.txt file should always be at the root of your domain. So if your domain is www.example.com, the crawler should find it at https://www.example.com/robots.txt.
It’s also essential that your robots.txt file is called robots.txt. The name is case-sensitive, so get that right, or it won’t work.
Yoast SEO and robots.txt
Our plugin has sensible defaults, but you can always change things as you see fit. Yoast SEO provides a user-friendly interface to edit the robots.txt file without needing to access it manually. With Yoast SEO, you can access and configure the robots.txt feature through the plugin’s settings. It allows you to include or exclude specific website areas from being crawled by search engines. When used in conjuncture with the crawl settings,
Pros and cons of using robots.txt
Pro: managing crawl budget
It’s generally understood that a search spider arrives at a website with a pre-determined “allowance” for how many pages it will crawl (or how much resource/time it’ll spend, based on a site’s authority/size/reputation, and how efficiently the server responds). SEOs call this the crawl budget.
If you think your website has problems with crawl budget, blocking search engines from ‘wasting’ energy on unimportant parts of your site might mean focusing instead on the sections that matter. Use the crawl cleanup settings in Yoast SEO to help Google crawls what matters.
It can sometimes be beneficial to block the search engines from crawling problematic sections of your site, especially on sites where a lot of SEO clean-up has to be done. Once you’ve tidied things up, you can let them back in.
A note on blocking query parameters
One situation where crawl budget is crucial is when your site uses a lot of query string parameters to filter or sort lists. Let’s say you have ten different query parameters, each with different values that can be used in any combination (like t-shirts in multiple colors and sizes). This leads to many possible valid URLs, all of which might get crawled. Blocking query parameters from being crawled will help ensure the search engine only spiders your site’s main URLs and won’t go into the enormous spider trap you’d otherwise create.
Con: not removing a page from search results
Even though you can use the robots.txt file to tell a crawler where it can’t go on your site, you can’t use it to say to a search engine which URLs not to show in the search results – in other words, blocking it won’t stop it from being indexed. If the search engine finds enough links to that URL, it will include it; it will just not know what’s on that page. So your result will look like this:

Use a meta robots noindex tag if you want to reliably block a page from appearing in the search results. That means that to find the noindex tag, the search engine has to be able to access that page, so don’t block it with robots.txt.
Con: not spreading link value
If a search engine can’t crawl a page, it can’t spread the link value across the links on that page. It’s a dead-end when you’ve blocked a page in robots.txt. Any link value which might have flowed to (and through) that page is lost.
Robots.txt syntax
A robots.txt file consists of one or more blocks of directives, each starting with a user-agent line. The “user-agent” is the name of the specific spider it addresses. You can have one block for all search engines, using a wildcard for the user-agent, or particular blocks for particular search engines. A search engine spider will always pick the block that best matches its name.
These blocks look like this (don’t be scared, we’ll explain below):
User-agent: *
Disallow: /

User-agent: Googlebot
Disallow:

User-agent: bingbot
Disallow: /not-for-bing/
Directives like Allow and Disallow should not be case-sensitive, so it’s up to you to write them in lowercase or capitalize them. The values are case-sensitive, so /photo/ is not the same as /Photo/. We like capitalizing directives because it makes the file easier (for humans) to read.
The user-agent directive
The first bit of every block of directives is the user-agent, which identifies a specific spider. The user-agent field matches with that specific spider’s (usually longer) user-agent, so, for instance, the most common spider from Google has the following user-agent:
Mozilla/5.0 (compatible; Googlebot/2.1; +http://www.google.com/bot.html)
If you want to tell this crawler what to do, a relatively simple User-agent: Googlebot line will do the trick.
Most search engines have multiple spiders. They will use a specific spider for their normal index, ad programs, images, videos, etc.
Search engines always choose the most specific block of directives they can find. Say you have three sets of directives: one for *, one for Googlebot and one for Googlebot-News. If a bot comes by whose user-agent is Googlebot-Video, it will follow the Googlebot restrictions. A bot with the user-agent Googlebot-News would use more specific Googlebot-News directives.
The most common user agents for search engine spiders
Here’s a list of the user-agents you can use in your robots.txt file to match the most commonly used search engines:
| Search engine | Field | User-agent |
|---|---|---|
| Baidu | General | baiduspider |
| Baidu | Images | baiduspider-image |
| Baidu | Mobile | baiduspider-mobile |
| Baidu | News | baiduspider-news |
| Baidu | Video | baiduspider-video |
| Bing | General | bingbot |
| Bing | General | msnbot |
| Bing | Images & Video | msnbot-media |
| Bing | Ads | adidxbot |
| General | Googlebot | |
| Images | Googlebot-Image | |
| Mobile | Googlebot-Mobile | |
| News | Googlebot-News | |
| Video | Googlebot-Video | |
| Ecommerce | Storebot-Google | |
| AdSense | Mediapartners-Google | |
| AdWords | AdsBot-Google | |
| Yahoo! | General | slurp |
| Yandex | General | yandex |
The disallow directive
The second line in any block of directives is the Disallow line. You can have one or more of these lines, specifying which parts of the site the specified spider can’t access. An empty Disallow line means you’re not disallowing anything so that a spider can access all sections of your site.
The example below would block all search engines that “listen” to robots.txt from crawling your site.
User-agent: *
Disallow: /
The example below would allow all search engines to crawl your site by dropping a single character.
User-agent: *
Disallow:
The example below would block Google from crawling the Photo directory on your site – and everything in it.
User-agent: googlebot
Disallow: /Photo
This means all the subdirectories of the /Photo directory would also not be spidered. It would not block Google from crawling the /photo directory, as these lines are case-sensitive.
This would also block Google from accessing URLs containing /Photo, such as /Photography/.
How to use wildcards/regular expressions
“Officially,” the robots.txt standard doesn’t support regular expressions or wildcards; however, all major search engines understand it. This means you can use lines like this to block groups of files:
Disallow: /*.php
Disallow: /copyrighted-images/*.jpg
In the example above, * is expanded to whatever filename it matches. Note that the rest of the line is still case-sensitive, so the second line above will not block a file called /copyrighted-images/example.JPG from being crawled.
Some search engines, like Google, allow for more complicated regular expressions but be aware that other search engines might not understand this logic. The most useful feature this adds is the $, which indicates the end of a URL. In the following example, you can see what this does:
Disallow: /*.php$
This means /index.php can’t be indexed, but /index.php?p=1 could be. Of course, this is only useful in very specific circumstances and pretty dangerous: it’s easy to unblock things you didn’t want to.
Non-standard robots.txt crawl directives
In addition to the commonly used Disallow and User-agent directives, there are a few other crawl directives available for robots.txt files. However, it’s important to note that not all search engine crawlers support these directives, so it’s essential to understand their limitations and considerations before implementing them.
The allow directive
While not in the original “specification,” there was early talk of an allow directive. Most search engines seem to understand it, and it allows for simple and very readable directives like this:
Disallow: /wp-admin/
Allow: /wp-admin/admin-ajax.php
The only other way of achieving the same result without an allow directive, would have been to specifically disallow every single file in the wp-admin folder.
The crawl-delay directive
Crawl-delay is an unofficial addition to the standard, and few search engines adhere to it. At least Google and Yandex don’t use it, with Bing being unclear. In theory, as crawlers can be pretty crawl-hungry, you could try the crawl-delay direction to slow them down.
A line like the one below would instruct those search engines to change how frequently they’ll request pages on your site.
crawl-delay: 10
Do take care when using the crawl-delay directive. By setting a crawl delay of ten seconds, you only allow these search engines to access 8,640 pages a day. This might seem plenty for a small site, but it isn’t much for large sites. On the other hand, if you get next to no traffic from these search engines, it might be a good way to save some bandwidth.
The sitemap directive for XML Sitemaps
Using the sitemap directive, you can tell search engines – Bing, Yandex, and Google – where to find your XML sitemap. You can, of course, submit your XML sitemaps to each search engine using their webmaster tools. We strongly recommend you do so because webmaster tools will give you a ton of information about your site. If you don’t want to do that, adding a sitemap line to your robots.txt is a quick alternative. Yoast SEO automatically adds a link to your sitemap if you let it generate a robots.txt file. On an existing robots.txt file, you can add the rule by hand via the file editor in the Tools section.
Sitemap: https://www.example.com/my-sitemap.xml
Don’t block CSS and JS files in robots.txt
Since 2015, Google Search Console has warned site owners not to block CSS and JS files. We’ve told you the same thing for ages: don’t block CSS and JS files in your robots.txt. Let us explain why you shouldn’t block these specific files from Googlebot.
By blocking CSS and JavaScript files, you’re preventing Google from checking if your website works correctly. If you block CSS and JavaScript files in yourrobots.txt file, Google can’t render your website as intended. Now, Google can’t understand your website, which might result in lower rankings. Moreover, even tools like Ahrefs render web pages and execute JavaScript. So, don’t block JavaScript if you want your favorite SEO tools to work.
This aligns perfectly with the general assumption that Google has become more “human.” Google wants to see your website like a human visitor would, so it can distinguish the main elements from the extras. Google wants to know if JavaScript enhances the user experience or ruins it.
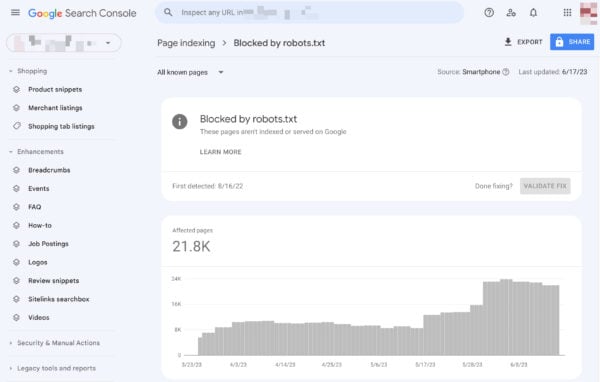
Test and fix in Google Search Console
Google helps you find and fix issues with your robots.txt, for instance, in the Page Indexing section in Google Search Console. Select the Blocked by robots.txt option:
Unblocking blocked resources comes down to changing your robots.txt file. You need to set that file up so that it doesn’t disallow Google to access your site’s CSS and JavaScript files anymore. If you’re on WordPress and use Yoast SEO, you can do this directly with our Yoast SEO plugin.
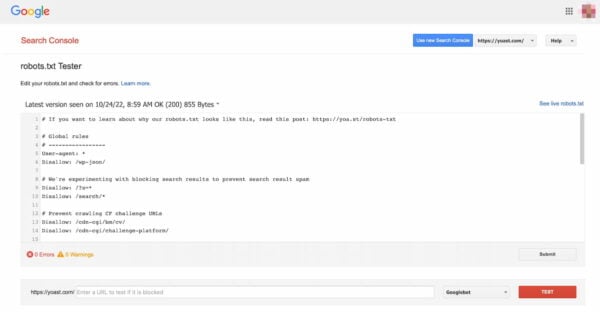
Validate your robots.txt
Various tools can help you validate your robots.txt, but we always prefer to go to the source when validating crawl directives. Google has a robots.txt testing tool in its Google Search Console (under the ‘Old version’ menu), and we’d highly recommend using that:
Be sure to test your changes thoroughly before you put them live! You wouldn’t be the first to accidentally use robots.txt to block your entire site and slip into search engine oblivion!
Behind the scenes of a robots.txt parser
In 2019, Google announced they were making their robots.txt parser open source. If you want to get into the nuts and bolts, you can see how their code works (and even use it yourself or propose modifications).
