How to change the canonical URL in Yoast SEO for WordPress
Yoast SEO adds canonical URLs to your WordPress site: if you have multiple posts or pages with similar content, it tells the search engines what URL contains the original content. In some cases, you may want to change the canonical URL of your WordPress site manually. In this article, we’ll explain how you can change the canonical URL if you have Yoast SEO for WordPress.
How to change the canonical URL: video explanation
How to change the canonical URL
To change your canonical URL in WordPress, follow the steps below
- Log in to your WordPress website
You are now in your Dashboard.
- Go to the Post, Page, Category or Tag for which you want to change the canonical URL
You are now in the editor of the Post, Page, Category or Tag.
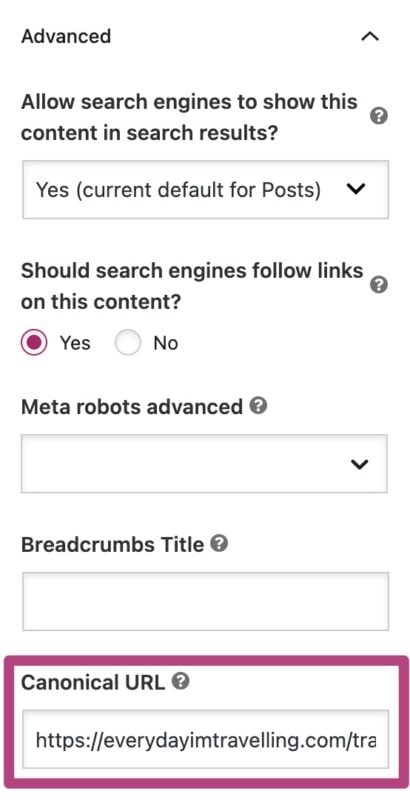
- In the Yoast SEO sidebar, go to Advanced

- In the Canonical URL field, enter the full canonical URL
You must include the full address, including http; https; www; or non-www at the beginning of the URL.

- Publish, Save, or Republish your post to change your canonical URL
When you publish your revised post, including the canonical URL, the changes are applied.
How to filter the canonical output programmatically
If you have experience with coding, you can also filter the output programmatically. To do this, you can use the wpseo_canonical filter. If you return false on that, no canonical will be output. We have provided several examples.
I have a problem with changing the canonical URL
In some cases, you may not see a canonical tag output on a page. In this case, check if the page has a noindex tag. We do not output a canonical tag if the page is marked as noindex. To resolve the issue, mark the pages as index.
If the steps in this article do not resolve the issue, contact our Support team to get help.
Did this article answer your question?
Still having issues?
Try searching for your issue below

