Using git bisect to find the commit that broke your code

As plugin developers, we are continuously working on implementing features and fixing bugs. We’re not flawless, but fortunately we, at Yoast, have a QA team that tests our plugin daily, both manually and automatically. Sometimes when they find a bug, a specific commit or pull request comes to mind that is the likely cause. Sometimes we have no idea because we have merged a lot or the bug turned out to be introduced a long time ago. In those cases, git bisect comes in very handy. That is, if you use git for version control. In this post, I’ll explain what git bisect is, and how you can use it to find in which commit a bug was introduced.
What is git bisect?
Git bisect is an efficient way to find a faulty commit. The name itself actually tells us how it works: according to the Merriam-Webster dictionary ‘to bisect’ means “to divide into two usually equal parts”. That is exactly what git bisect does: it takes a start commit and an end commit, and checks out the commit exactly in the middle. After you have assessed that middle commit, you need to enter whether the bug is present at that point in history or not. Your answer will be used to determine what the next iteration looks like. If the answer is ‘yes’, the current commit will be used as the start commit. If the answer is ‘no’, it will be used as the end commit. You’ll continue assessing commits until you have found the one commit that introduced the bug you’re looking for.
This is the most efficient way to find the faulty commit without having to test all commits individually. Especially when you are dealing with a long list of commits, using git bisect can save you a lot of time.
Finding the culprit: an example
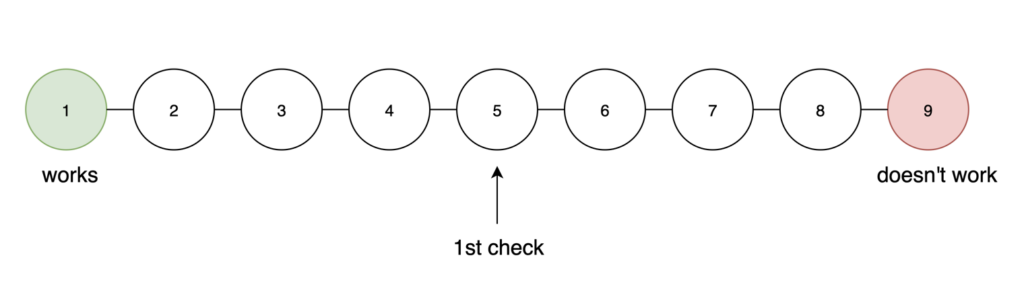
The above explanation might sound a bit abstract, so an example might help. Let’s imagine you have a project with nine commits. Those commits are shown in the image below, in which they’re represented with simplified commit hashes 1 to 9. You know the first commit works fine, but when you checkout the ninth commit there is a bug.

To start bisecting, type git bisect start in your terminal. Next, you have to specify a commit without the bug. In this example that would be commit 1, which means the next command would be git bisect good 1. The third command specifies a commit with the bug: git bisect bad 9. In those commands, I used the (simplified) commit hashes 1 and 9. You can also use a tag (for example tag/12.0) or HEAD. If you don’t specify anything after good or bad, it will take the commit you’ve currently checked out.
The first commit that will get checked is commit 5 because that is the middle commit (see the image below). If there are any build steps to take, take them, and test the functionality that has the bug. If the bug is present in this commit, type git bisect bad, if not, type git bisect good. In this example, commit 5 is bad.
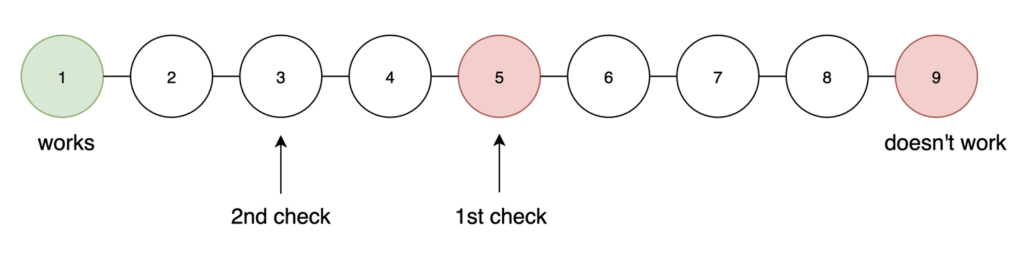
Now we know the bug was introduced somewhere between commit 2 and 5. Commit 3 will be checked out next, after which you have to do the building steps and type git bisect bad or good. In this example, commit 3 is good.
We now know that the bug was introduced in commit 4 or 5. This means that commit 4 is the last commit that needs to be checked. Let’s say commit 4 is fine as well, so we type git bisect good.
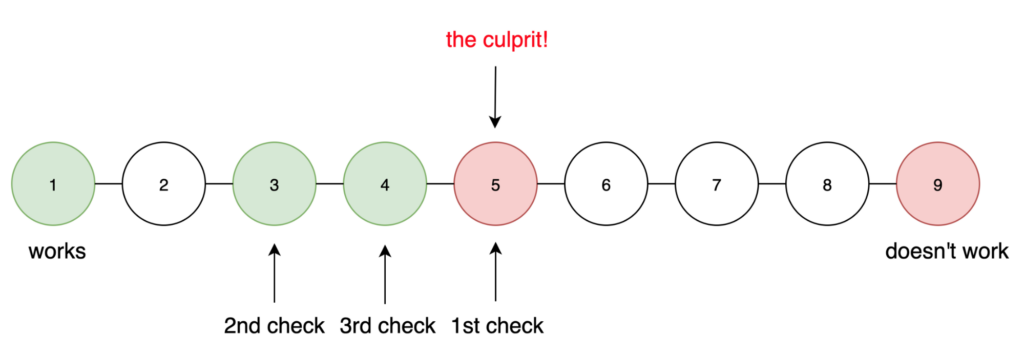
It turns out commit 5 was the culprit all along! In your terminal, you’ll see its commit hash, author, date, and message. If you want to return to the commit you checked before your started bisecting, type git bisect reset. To check out the commit that introduced the bug, type git bisect reset <hash of the faulty commit>. Now you can look at the faulty commit, and start fixing the bug!
Folder- or file-specific git bisect
If you are already quite sure the bug you encountered is in a specific folder or file, you can do a folder- or file-specific git bisect. In that case, the first command is git bisect start -- path/to/file. All other steps are the same. There is one important difference, though: only commits touching the specified file or folder will be taken into account. This means you’ll probably find the faulty commit in fewer steps than when you wouldn’t have passed a file or folder. Especially when there are a lot of commits between the start commit and end commit, it could be worth it to reduce the number of steps this way.
A handy time-saver
I think it’s evident that git bisect can be a big time-saver. In the example, it took 3 steps to find the faulty commit. Without git bisect it might have taken 8 steps, in the worst-case scenario. And if we would have already had a vague idea where the bug might have been, doing a folder- or file-specific git bisect could have saved us even more time. So next time you encounter a bug and have no idea where to start looking: use git bisect!
Irene is Yoast's Head of R&D. She is a web developer with a passion for linguistics.

Introduction to Yoast SEO webinar
A practical, demo-driven webinar on using Yoast SEO for WordPress with confidence.
All Yoast SEO WebinarsWorldPride Amsterdam 2026
Team Yoast is Attending at WorldPride Amsterdam 2026! Click through to see who will be there, what we will do, and more!
See where you can find us nextThe SEO Update by Yoast – August 2026
Expert analysis of the latest SEO & AI news developments with Carolyn Shelby and Alex Moss. Watch the update here. 📺
All Yoast SEO Podcasts