Testing WordPress plugins can be difficult, especially during development, when you want the feedback loops to be small. A local development environment can help. This enables you to test your plugin on a local WordPress installation, running on your own computer, without the need for a live website. However, setting one up can be difficult, resource-intensive and error-prone. Especially when you use a full-fledged virtual machine (VM) like Vagrant to run your local webserver.
In this post, we will explain how you can set up your WordPress development environment using Docker instead. Docker uses containers to run software in isolation from each other. However, it does not need a full and heavy VM because it makes use of the capabilities of the underlying operating system. This makes a WordPress development environment in Docker a lot smaller, faster and easier to set up!
Prerequisites
Before we can start to set up a WordPress development environment in Docker, we need to do a few things:
This gives you a way to describe what kind of Docker setup you want in a nice and concise way.
If you are working on a Mac, you can install Docker Desktop instead. It includes Docker and Docker Compose out of the box.
Before we are going to dive into the nitty-gritty implementation details, let us first answer the question: what are containers, and how do they work?
What are containers?
Docker packs an application, its configuration, and its dependencies into one unit, the container. This isolates the code from the hardware on which it runs. This makes it easier to run the same container on different environments.
In contrast to virtual machines, containers do not include an operating system. Instead, they make use of the underlying operating system on which the container runs. This makes containers, in general, lightweight and quick to start.
Another great thing about containers is that they are modular. This means that we can create a development environment by combining different containers. Moreover, pre-made container images already exist for many standard pieces of software-like databases and servers. We only need to tell Docker Compose which containers we need and how to configure them. I will tell you how to do this in the next section.
Creating a docker-compose file
First of all, let us create a folder that will house our development environment. I am going to call it wordpress-docker.
In this folder, we are going to create a so-called docker-compose file. In this file, we are going to configure which parts, called containers, Docker should boot up whenever we start our environment.
Create a file called docker-compose.yml in your newly created development environment folder. In this file, write the following:
This tells Docker Compose that the configuration is written for version 3.3 of Docker Compose. The services option will contain the configuration of the different containers we are going to use.
Adding containers
Adding a database
Before we can set up a container for WordPress, we will need to configure a database container first. In this container, WordPress will save all our website’s data, like our blog posts but also our website’s settings.
We are going to use MySQL as our database. Add the following lines to docker-compose.yml, under services:
This will add a new container called local-wordpress-db. We tell Docker to use the official mySQL container image, version 5.7, as a base using the image option. The next few lines of code configure our container:
volumes: Maps folders from your computer to folders inside of the container.
This way, we can access and modify the database data as if it were files and folders on our own computer and vice-versa.
ports: Maps a server port from your computer to a server port inside of the container.
This way we can access the database on port 18766 on our computer.
environment: Sets some environment variables inside of the container.
In this case, it sets the name, username, password and root password of the database.
Adding a WordPress installation
Now that we have a working database, we can add a WordPress container.
For this tutorial, we will make use of the official WordPress Docker container. It includes an Apache server and PHP out of the box. We are just going to use the latest WordPress version. However, if you want a different version, or even a different PHP version, you can use another version as well.
To configure the WordPress container, add these lines to docker-compose.yml :
The configuration is similar to the one for the database. One option has been added: depends_on. This option tells Docker Compose that the db container should be started before this container can be started. This makes sense, because WordPress can only connect to the database when it is up and running.
Starting the containers
Now that we have a working Docker setup, we can start it and see our local WordPress development environment in action! Navigate to the folder in which you saved the docker-compose file with your terminal or command line. Then, run docker-compose up to start the containers.
It can take a minute for the containers to start the first time. When they have started, you can open a web browser and go to localhost to start your website and install WordPress. You can stop the containers by pressing Ctrl-c inside of the terminal window in which you started the containers.
Using the dev environment for plugin development
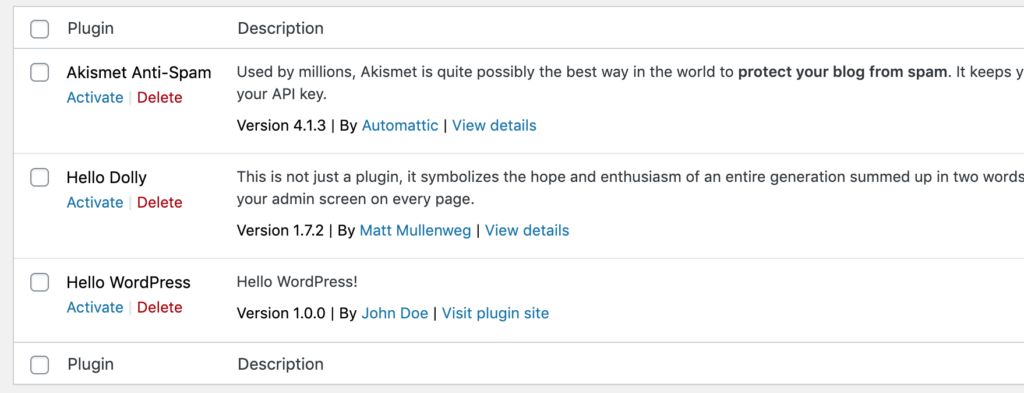
If you take a look at the folder in which you saved the docker-compose.yml file, you will see a few extra folders. This includes a plugins folder. This folder is mapped to the plugins folder of the WordPress installation in your container. If you open it, you will see the plugins that are installed in WordPress by default: Akismet and Hello Dolly.
You can easily test your own plugins by adding their files to this folder. Let us create a simple plugin as an example.
Create a new PHP file in the plugins folder called hello_wordpress.php and add this content to it:
This registers a plugin to your WordPress installation called “Hello WordPress”, with some extra information like a description and a fictional author.
Now start your Docker containers using docker-compose up . If you go to the plugins section of your local WordPress website, you will see your newly added plugin!
The plugins section of your website, with the newly added “Hello WordPress” plugin.
Conclusion
Setting up a WordPress development environment using Docker is quick and easy. By adding a docker-compose.yml configuration file and using a couple of predefined container images, we can start one up in a few steps. Because it’s so quick and easy, Docker is a good alternative to other approaches such as Vagrant, since Vagrant adds the extra overhead of a virtual machine.
Hans-Christiaan Braun
Hans-Christiaan is a web developer at Yoast. In his free time he teaches children how to code at the local CoderDojo.
August 02, 2025
Team Yoast is at Attending Pride Amsterdam 2025! Click through to see who will be there, what we will do, and more!
See where you can find us next »
14 July 2025
Learn how to start your SEO journey the right way with our free webinar. Get practical tips and answers to all your questions in the live Q&A!
All Yoast SEO webinars »